Following up on my midterm project, I wanted to make a wearable digital compass, that would point to a destination you give it, instead of pointing North. Here is the process I went through, the successes and the failures.
The Parts
I ordered my parts from sparkfun. I got an ATtiny85 which I could program with the Arduino Uno, a compass module, and ripped some lights out of a children’s shoe (actually Bona did this part for her own project and donated the extra pink ones to me!). Eventually I thought this wearable would use bluetooth to communicate with a cellphone to get current GPS location and destination location, but I left this part out for this iteration. The locations will be hardcoded for now.
Testing the Compass Module
The module was actually fairly easy to setup. It has a breakout board and code posted on sparkfun. I used a variant of the code posted on bildr.org to get a simple circuit to point north. Here I’m using 4 lights instead of 8 like I did in the midterm.
Video: to be posted soon
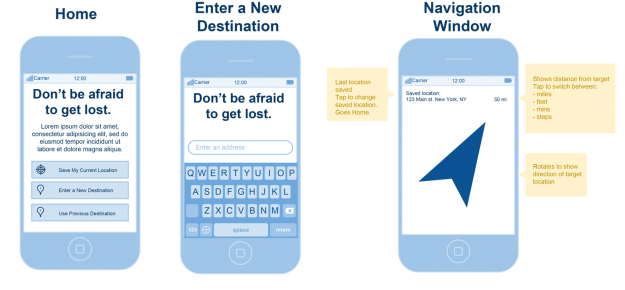
Then I wrote a script so that it would take two points, where you are and where you want to go, (each with a latitude and longitude) and your heading from the compass, and point in the direction of your destination.
Programming the ATtiny85
I was pretty excited about this part. The ATtiny85 is pretty tiny so it seems it would be great for wearables. However, I soon realized that that the tiny was too tiny for my project, because I needed at least 6 pins (4 lights and 2 for the compass) and it only had 5. Plus some of the functions used by the compass module are not supported by the ATtiny. Doh!

But before I realized all this, I followed the tutorial at High-Low Tech and got my ATtiny to make a blinking light! Pretty cool huh?
Video: https://vimeo.com/55919894
The Wearable’s Shape Part 1: Clip-On Compass
At one point, I considered using a hard shelled bracelet, like a bangle, so that it could accomodate all the hardware. But that style was not at all in my vision, plus I would never wear a bangle, it’s just not me. My compass was more for someone who was on a hike, a bike ride, or an urban wandering walk. I wanted it to be a bit sporty, a bit rugged.
I designed a clip-on compass made of fabric, that you could clip to your bag or clothes.

To make it compact, I thought I stack everything on top of each other…

But as soon as I started sewing it, it became clear why that was a bad idea.


It was getting messy. I wouldn’t be able to control the thread from crossing and short-circuiting.
The Wearable’s Shape Part 2: Wristband
So I went back to my original idea of a wristband. I could spread out the hardware a bit more, than trying to stack them. I found this awesome armband at the Army/Navy story on 8th street between 5th and 6th avenue. It’s for service men and women to put their watch. It’s a little hard to see in the photo but it has velcro straps that go around your wrist, two smaller velcro straps inside to hold the watch face, and a velcro flap that folds over the face of the watch to protect it. This was much closer to the aesthetic I was originally thinking.

So I started to sew the compass in…


Unfortunately, this is as far as I got, because I can’t get a reading on the compass. I’m still debugging, but I’m guessing there are threads touching somewhere. I also need to solder, so that could be the issue too. But when it’s done, there will be lights on the top here:


Even if I got the sewn compass working, it’s not perfect. the lilypad is too wide for the wristband, but it would suffice for a prototype among prototypes.
I really want to continue this project and having it working. There are many more lessons to learn in this, including improving my sewing skills.
Lessons Learned the Hard Way
- The less hardware, the better! More hardware, makes it not so soft
- Stacking hardware to save space is a bad idea, especially if you don’t really know what you’re doing.
- Make sure your microcontroller has all the pins you need and supports your functions.
- You can try to plan out things in three dimensions forever. Just start making it so you can see where you fail and start remaking it sooner.
- Sewing a circuit is hard and time consuming, but will be easier with practice.
- The form is as important as the function, and deserves equal amount of time, planning, effort, stress, etc.


 Sewing the Circuit