Paired

Paired is a set of wearable, networked devices exploring intimate communication between people via screenless, interactive technologies. This was my graduate thesis project while attending ITP.
DESCRIPTION
Our current digital tools empower us to interact with our environment in new ways, being able to connect with more people and things at once. While the modes of communication and how we connect are expanding, what happens to the depth of our messages? In digital spaces, we can send an email, voice, texts, pictures, videos, approval, and even money. What if we wanted to send a pat on the back, a hug, or “I’m thinking of you”? Paired is worn near personal spaces on the body. Couples send and receive messages via Paired’s tactile interface. These simple notifications form a language that’s real-time, subtle, and intimate between lovers: the physical rendering of a sweet nothing from a distance.
PERSONAL STATEMENT
I am interested in how people communicate with one another through the use of digital tools, and what it is that can be communicated. Are there ways that we can express a feeling like empathy or compassion with more than text messages, pictures, and the like? How can we improve the quality of digital communication to build healthier relationships with one another? There is research that suggests hearing the heartbeat of someone you are talking to gives the same feeling of personal contact as looking at that person in the eye. Affective computing uses sensors to bring emotional and subconscious data out from the body and brain. But there has been little done in communicating conscious, emotional data in a way that’s personal.
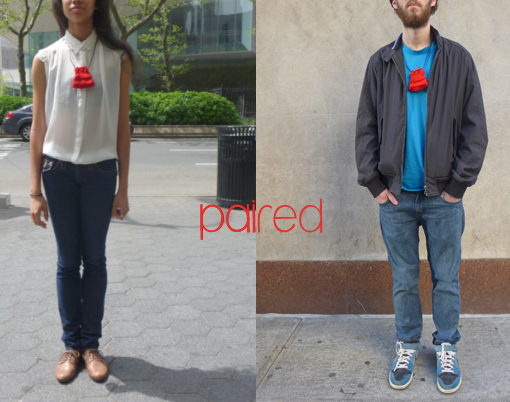
Paired is a set of necklaces for couples to be worn near the skin. When you grab one, as if you were holding your heart, it warms the other, essentially warming their heart. It’s the physical rendering of a sweet nothing from afar. Paired pulls your interaction with your partner off screen, out of your pocket and away from your other daily digital interactions. It lives in a private space on your body, on your chest, and reserves that space for only sending and receiving messages from loved one.
Computers and technology are able to both invade and protect our personal spaces. How we create and sustain bonds in our most personal spaces, our relationships, will include them in the future. Paired is my thought process for how we might begin to interface with this entity.
RESEARCH PROCESS
I’ve done the bulk of my research in human communication, human bonding and relationships. Bonding is the process of attachment that happens between parents and children, romantic partners, close friends, and groups like sporting teams or people who spend a lot time together. Oxytocin, also affectionately known as the ‘love hormone,’ is the hormone largely responsible for allowing this type of attachment to happen. With humans, we release oxytocin and create bonds while performing behaviors like giving or receiving massages, kissing, holding in stillness, synchronized breathing. Many of these behavior involve touch, with the intent to comfort. My idea is to create some resemblance of touch through a device, and knowing that this touch came from your loved one, it would release oxytocin, and create a feeling of intimacy though this distant communication.
DESIGN PROCESS
I’m focusing on communication that’s intimate, meaning between people who are very close whether they are romantic partners, family, or close friends.
Based on research and things I took from testing other products in this realm, I came up with four design pillars for Paired. For Paired to be successful, it need to be:
- Real-time: with things like SMS, twitter, etc., we are now accustomed to communications that are happening in the now. The user will be able to send love exactly when they want and it will be received a few seconds later.
- Subtle: see below
- Intimate: subtle and intimate go together. It’s the space that the project lives in, intimate relationships. With intimacy comes a sense of privacy, so it’s important that the interaction are subtle.
- Wearable: Making it a wearable would mean it would live as close to the body as possible, which plays directly in the intimate space in relation to how we interact with other people. It connects the two users directly to each other and in a way connects their bodies themselves.
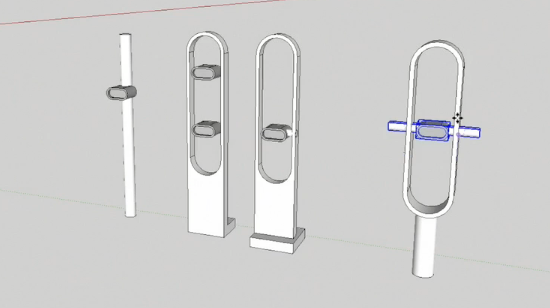
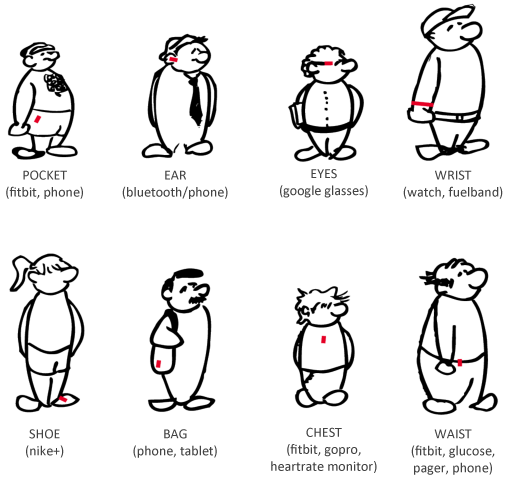
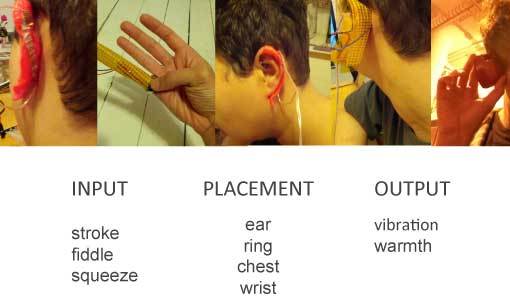
I mapped out how we currently interact with popular wearables like the fitbit and gopro and then thought about designing for personal spaces on the body like the ears, hands, wrists, crotch, neck, and chest. I came up with a system of input for sending a message and outputs for receiving the message. For input, I used stroke and touch, and for output used vibration and warmth.
In the end, I landed on making necklaces that live close to the chest. You apply pressure and the other one becomes warm.
PRODUCTION PROCESS
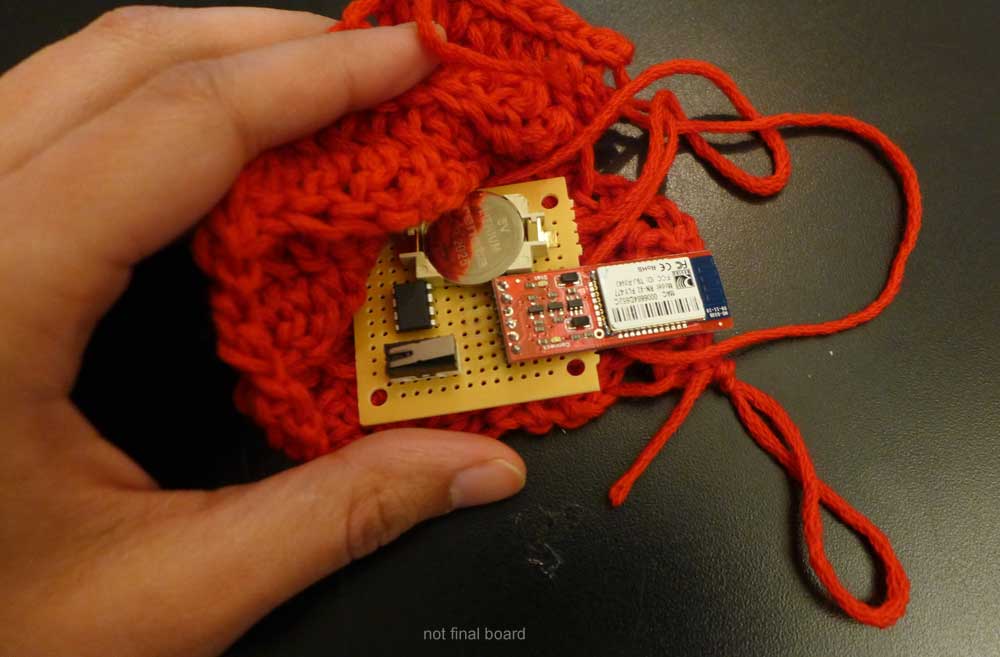
Fabrication was my weakest area coming into this project. Luckily I had a lot of help. I met with friends and classmates who were better versed in this, and got help in making the necklaces. They are made of crocheted red wool and hang on a leather strap. Paired is made up of:
- an ATTiny85 microcontroller which handles the logic
- a bluetooth modem for sending and receiving data to the paired cellphone
- a switch for sensing when pressure is applied
- conductive thread which warms up the pouch
- and a battery.
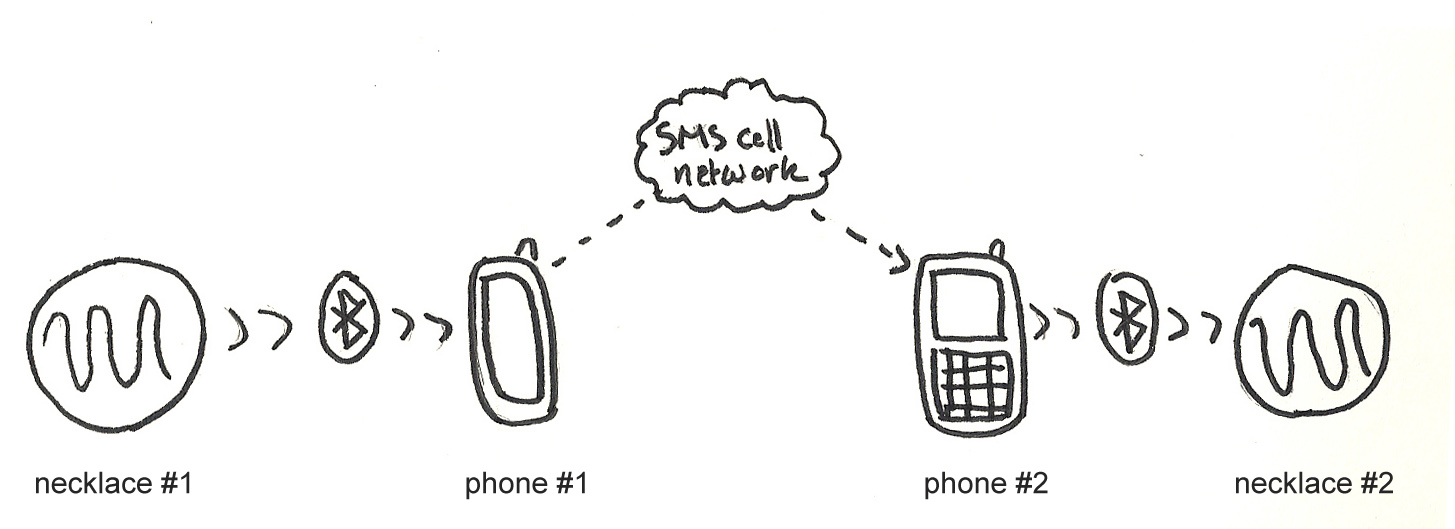
Technically, I made Paired as a mixture of physical computing and Android app development. When one Paired necklace is squeezed (or when pressure is applied) a message is sent via bluetooth to the wearer’s phone running the app. The app then sends a special SMS to the other phone number, who is also running the app. When that phone receives the message is stops it from reaching the phone built in messaging system, and alerts the second device to become warm.
It took me some time to finally get into production, because I was getting caught up in user testing and research. I finally decided to go with my gut and move forward with my original vision for Paired.
USER TESTING
Once I came up with the basic inputs and outputs, I made very rough prototypes to test the different sensations. I used clay as my prototyping material and connected two ‘devices’ with really long wires, since the system was not wireless yet. I first tested with me and my partner and we found it to be a novel and fun interaction.
So I planned a user test with 4 others to try them too. My strategy was to simulate that the output might happen at any random moment throughout their day. I attached the device to them and I had them read a really long article online. At some point, I triggered the output, and then we talked about it. I repeated the test the same person by asked them to think about their partner. There are more details about this on the blog.
Most of my users did not like the product. They mostly had a very extreme negative reaction to it. They said it was awkward, alarming, it made them nervous, it made them think of danger, etc. Here are words that came up during this user test:
|
shocking doorbell nervous squeezed hand felt nice abused wouldn’t wear it open to try |
uncomfortable alarming danger dumb-down awkward concerning distracting concerned |
warm parallel sensations cheap communication aggressive subtle alarming pinch |
It was hard to replicate the context that Paired is supposed to be in. First of all, I was sitting right next to them the whole time. Second, their partners were not involved in the user test, I only had them think about their partner. It made sense that they would feel awkward. I’m also dealing with intimacy which is a very personal thing between two people, and not something you can ready share with others. The user test itself was awkward. Even I felt awkward administering it! I could have been projecting my awkwardness that as well. I went ahead and made what I envisioned anyway.
FEEDBACK
Most people really liked my concept and where I was coming from. It seemed like people were way more interested in the concept than in the physical product and how it worked. I’ve received a fair amount feedback throughout this process. Here are of a few of them with my response.
Suggestion: Emotions are complex, maybe you should try to build in other sensations/intentions, not just warmth, maybe a pinch for example.
My response: This was a good point. But I did not have time to address it. I also wanted to keep it simple. Emotions are complex.
Suggestion: What about reciprocity? When you hug someone, you are also hugged. Is that something you can build in? and how?
My response: I really considered this early on in the project. All good communication has some reciprocity. Again I needed to keep it simple. Paired is like a sweet nothing or a physical ‘Facebook poke,’ one way.
Suggestion: You’re dealing with affection, and affection can be freaky. That’s ok. You don’t need the users to validate it, there are tons of affectionate behaviours that others find creepy or weird, and you should play that up.
My response: Totally valid, probably why my users in my user test freaked out. In the end, I made what I envisioned it should be and it worked out.
Suggestion: It’s like a ‘poke’, the invitation is too low
My response: This is true. It IS like a Facebook poke, but it doesn’t take away what role these ‘pokes’ have in our bonding behaviors. It is true that over time it could be abused and lose its meaning. That’s up to the people who are using it. But it is interesting to think about the longevity of this product.
CONCLUSIONS
After my user test I struggled with what to do next. I thought I needed to refine my test, try different environments and contexts, different sensations and placement, to get results that were more positive or closer to the sensations I was trying to create. This would mean my project would turn into a research project. I like research and user testing but in talking to my peers I was reminded that I actually started this process with the intent of making something. This was a turning point for me. I had to make a decision about what this product was finally and start making. I learned that sometimes you just have to go with your gut.
For next steps, I’d like to work on the form. One of my design pillars was ‘subtle’ and as lovely as the red crocheted necklaces are, they aren’t very subtle. It doesn’t feel like a secret between two people, which is fine, but very much strayed from the design intent.